


Note
Click here to download the full example code
IMU Integrator Tutorial
Uncomment this if you’re using google colab to run this script
# !pip install pypose
# !pip install pykitti
In this tutorial, we will be doing IMU integration using the pypose.module.IMUPreintegrator module.
1. What is IMU integration
An Inertial Measurement Unit (IMU) is a device that can measure accelaration and angular velocity.
- An IMU typically consists of:
Gyroscopes: providing a measure of angular velocity
Accelerometers: providing a measure of acceleration
- With acceleration and angular velocity, we can get velocity and position using basic kinetics:
The first integral of acceleration over time is the change in velocity.
The second integral of acceleration over time is the change in position.
This process is called the IMU preintegration, often used in applications in robotics like SLAM (Simultaneous Localization and Mapping).
Uncertainty
However, IMU measurements contains very big noise. For example, if we put an IMU sensor in a static position, the measurements will jump around zero. That’s why, the more we integrate, the more uncertain we are. This uncertainty can also be measured mathematically. Please refer the doc for the math.
We will see below in a simple example, how we can get the IMU integrated position and the uncertainty
with pypose.module.IMUPreintegrator.
import os
import argparse
import torch
import pykitti
import numpy as np
import pypose as pp
from datetime import datetime
import torch.utils.data as Data
import matplotlib.pyplot as plt
from matplotlib.patches import Ellipse
from matplotlib.collections import PatchCollection
2. Dataset Defination
First we will define the KITTI_IMU dataset as a data.Dataset in torch, for easy usage.
We’re using the pykitti package.
This package provides a minimal set of tools for working with the KITTI datasets.
To access a data sequence, use:
dataset = pykitti.raw(root, dataname, drive)
Some of the data attributes we used below are:
dataset.timestamps: Timestamps are parsed into a list of datetime objectsdataset.oxts: List of OXTS packets and 6-dof poses as named tuples
For more details about the data format, please refer to their github page here.
A sequence will be seperated into many segments. The number of segments is controlled by step_size.
Each segment of the sequence will return the measurements like dt, acc, and gyro
for a few frames, defined by duration.
class KITTI_IMU(Data.Dataset):
    def __init__(self, root, dataname, drive, duration=10, step_size=1, mode='train'):
        super().__init__()
        self.duration = duration
        self.data = pykitti.raw(root, dataname, drive)
        self.seq_len = len(self.data.timestamps) - 1
        assert mode in ['evaluate', 'train',
                        'test'], "{} mode is not supported.".format(mode)

        self.dt = torch.tensor([datetime.timestamp(self.data.timestamps[i+1]) -
                               datetime.timestamp(self.data.timestamps[i])
                               for i in range(self.seq_len)])
        self.gyro = torch.tensor([[self.data.oxts[i].packet.wx,
                                   self.data.oxts[i].packet.wy,
                                   self.data.oxts[i].packet.wz]
                                   for i in range(self.seq_len)])
        self.acc = torch.tensor([[self.data.oxts[i].packet.ax,
                                  self.data.oxts[i].packet.ay,
                                  self.data.oxts[i].packet.az]
                                  for i in range(self.seq_len)])
        self.gt_rot = pp.euler2SO3(torch.tensor([[self.data.oxts[i].packet.roll,
                                                  self.data.oxts[i].packet.pitch,
                                                  self.data.oxts[i].packet.yaw]
                                                  for i in range(self.seq_len)]))
        self.gt_vel = self.gt_rot @ torch.tensor([[self.data.oxts[i].packet.vf,
                                                   self.data.oxts[i].packet.vl,
                                                   self.data.oxts[i].packet.vu]
                                                   for i in range(self.seq_len)])
        self.gt_pos = torch.tensor(
            np.array([self.data.oxts[i].T_w_imu[0:3, 3] for i in range(self.seq_len)]))

        start_frame = 0
        end_frame = self.seq_len
        if mode == 'train':
            end_frame = np.floor(self.seq_len * 0.5).astype(int)
        elif mode == 'test':
            start_frame = np.floor(self.seq_len * 0.5).astype(int)

        self.index_map = [i for i in range(
            0, end_frame - start_frame - self.duration, step_size)]

    def __len__(self):
        return len(self.index_map)

    def __getitem__(self, i):
        frame_id = self.index_map[i]
        end_frame_id = frame_id + self.duration
        return {
            'dt': self.dt[frame_id: end_frame_id],
            'acc': self.acc[frame_id: end_frame_id],
            'gyro': self.gyro[frame_id: end_frame_id],
            'gyro': self.gyro[frame_id: end_frame_id],
            'gt_pos': self.gt_pos[frame_id+1: end_frame_id+1],
            'gt_rot': self.gt_rot[frame_id+1: end_frame_id+1],
            'gt_vel': self.gt_vel[frame_id+1: end_frame_id+1],
            'init_pos': self.gt_pos[frame_id][None, ...],
            # TODO: the init rotation might be used in gravity compensation
            'init_rot': self.gt_rot[frame_id: end_frame_id],
            'init_vel': self.gt_vel[frame_id][None, ...],
        }

    def get_init_value(self):
        return {'pos': self.gt_pos[:1],
                'rot': self.gt_rot[:1],
                'vel': self.gt_vel[:1]}
3. Utility Functions
These are several utility functions. You can skip to the parameter definations and come back when necessary.
imu_collate
imu_collate is used in batch operation, to stack data in multiple frames together.
def imu_collate(data):
    acc = torch.stack([d['acc'] for d in data])
    gyro = torch.stack([d['gyro'] for d in data])

    gt_pos = torch.stack([d['gt_pos'] for d in data])
    gt_rot = torch.stack([d['gt_rot'] for d in data])
    gt_vel = torch.stack([d['gt_vel'] for d in data])

    init_pos = torch.stack([d['init_pos'] for d in data])
    init_rot = torch.stack([d['init_rot'] for d in data])
    init_vel = torch.stack([d['init_vel'] for d in data])

    dt = torch.stack([d['dt'] for d in data]).unsqueeze(-1)

    return {
        'dt': dt,
        'acc': acc,
        'gyro': gyro,

        'gt_pos': gt_pos,
        'gt_vel': gt_vel,
        'gt_rot': gt_rot,

        'init_pos': init_pos,
        'init_vel': init_vel,
        'init_rot': init_rot,
    }
move_to
move_to used to move different object to CUDA device.
def move_to(obj, device):
    if torch.is_tensor(obj):
        return obj.to(device)
    elif isinstance(obj, dict):
        res = {}
        for k, v in obj.items():
            res[k] = move_to(v, device)
        return res
    elif isinstance(obj, list):
        res = []
        for v in obj:
            res.append(move_to(v, device))
        return res
    else:
        raise TypeError("Invalid type for move_to", obj)
plot_gaussian
plot_gaussian used to plot an ellipse measuring uncertainty,
bigger ellipse means bigger uncertainty.
def plot_gaussian(ax, means, covs, color=None, sigma=3):
    ''' Set specific color to show edges, otherwise same with facecolor.'''
    ellipses = []
    for i in range(len(means)):
        eigvals, eigvecs = np.linalg.eig(covs[i])
        axis = np.sqrt(eigvals) * sigma
        slope = eigvecs[1][0] / eigvecs[1][1]
        angle = 180.0 * np.arctan(slope) / np.pi
        ellipses.append(Ellipse(means[i, 0:2], axis[0], axis[1], angle=angle))
    ax.add_collection(PatchCollection(ellipses, edgecolors=color, linewidth=1))
4. Define Parameters
Here we define all the parameters we will use. See the help message for the usage of each parameter.
parser = argparse.ArgumentParser(description='IMU Preintegration')
parser.add_argument("--device",
                    type=str,
                    default='cpu',
                    help="cuda or cpu")
parser.add_argument("--batch-size",
                    type=int,
                    default=1,
                    help="batch size, only support 1 now") #why?
parser.add_argument("--step-size",
                    type=int,
                    default=2,
                    help="the size of the integration for one interval")
parser.add_argument("--save",
                    type=str,
                    default='../dataset/save/',
                    help="location of png files to save")
parser.add_argument("--dataroot",
                    type=str,
                    default='../dataset/',
                    help="dataset location downloaded")
parser.add_argument("--dataname",
                    type=str,
                    default='2011_09_26',
                    help="dataset name")
parser.add_argument("--datadrive",
                    nargs='+',
                    type=str,
                    default=["0001", "0002", "0005", "0009", "0011",
                             "0013", "0014", "0015", "0017", "0018",
                             "0019", "0020", "0022"],
                    help="data sequences")
parser.add_argument('--plot3d',
                    dest='plot3d',
                    action='store_true',
                    help="plot in 3D space, default: False")
parser.set_defaults(plot3d=False)
args, unknown = parser.parse_known_args()
print(args)
os.makedirs(os.path.join(args.save), exist_ok=True)
torch.set_default_tensor_type(torch.DoubleTensor)
Namespace(device='cpu', batch_size=1, step_size=2, save='../dataset/save/', dataroot='../dataset/', dataname='2011_09_26', datadrive=['0001', '0002', '0005', '0009', '0011', '0013', '0014', '0015', '0017', '0018', '0019', '0020', '0022'], plot3d=False)
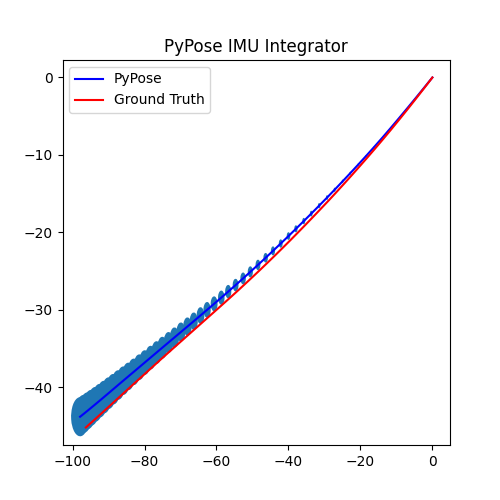
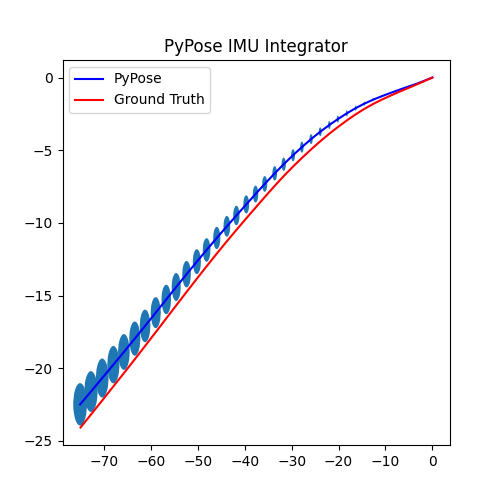
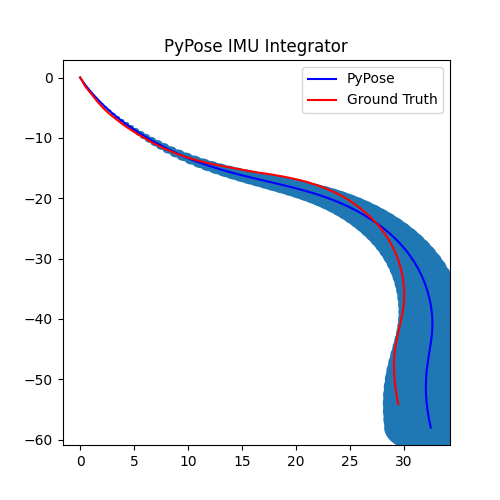
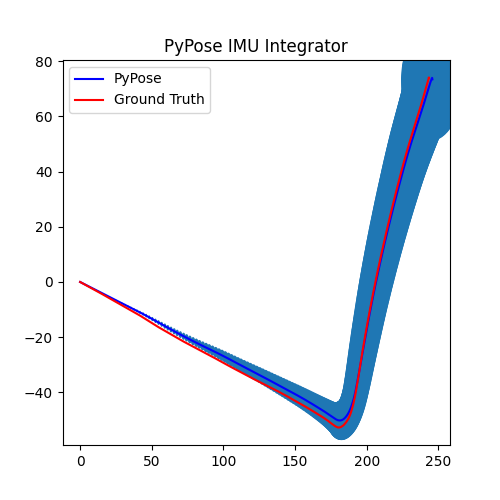
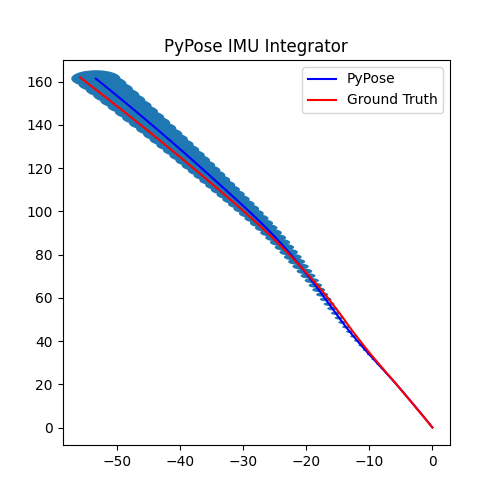
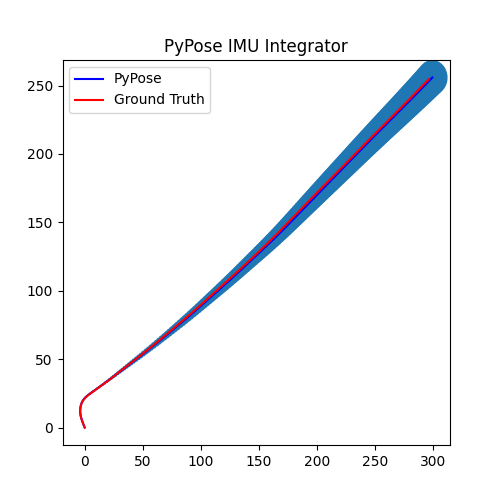
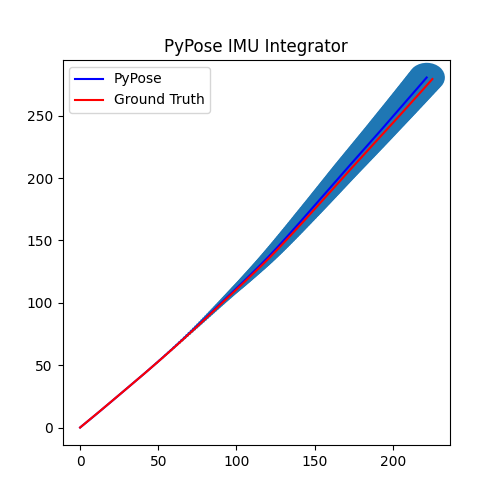
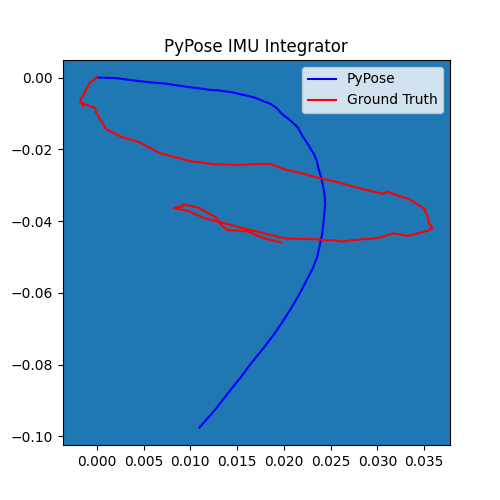
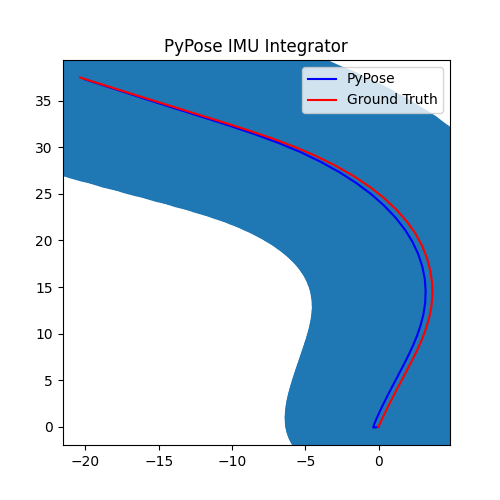
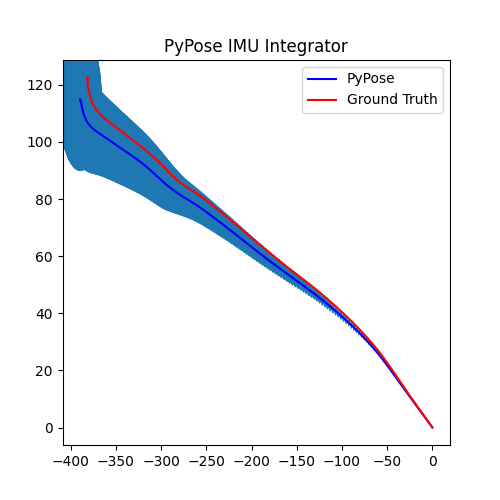
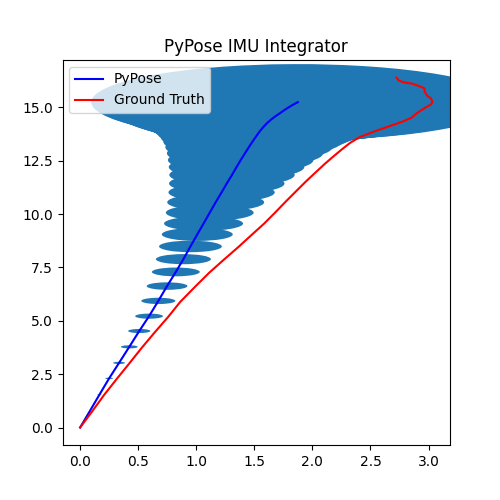
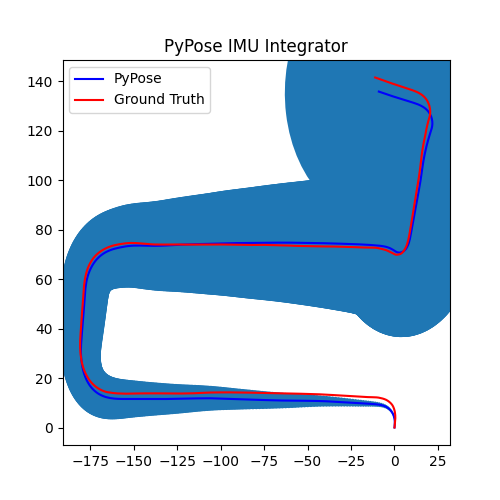
5. Perform Integration
With everything set up, we will perform the core operation of IMU integration. There are mainly 5 steps in the codes below:
Step 1: Define dataloader using the
KITTI_IMUclass we defined aboveStep 2: Get the initial position, rotation and velocity, all 0 here
Step 3: Define the IMUPreintegrator
- Step 4: Perform integration:
After running the forward function of the
integrator, the result is stored instate, wherestate['pos']is the integrated position, andstate['cov']is the uncertainty measurements.Note that
state['cov']is a 9x9 matrix in the order of rotation, velocity, and position. That’s why in visualization we are usingcovs[:, 6:8, 6:8]here: they are the covariance matrix ofxandyposition.Step 5: Visualization
for drive in args.datadrive:

    # Step 1: Define dataloader using the ``KITTI_IMU`` class we defined above
    dataset = KITTI_IMU(args.dataroot,
                        args.dataname,
                        drive,
                        duration=args.step_size,
                        step_size=args.step_size,
                        mode='evaluate')
    loader = Data.DataLoader(dataset=dataset,
                             batch_size=args.batch_size,
                             collate_fn=imu_collate,
                             shuffle=False)

    # Step 2: Get the initial position, rotation and velocity, all 0 here
    init = dataset.get_init_value()

    # Step 3: Define the IMUPreintegrator.
    integrator = pp.module.IMUPreintegrator(init['pos'],
                                            init['rot'],
                                            init['vel'],
                                            reset=False).to(args.device)

    # Step 4: Perform integration
    poses, poses_gt = [init['pos']], [init['pos']]
    covs = [torch.zeros(9, 9)]

    for idx, data in enumerate(loader):
        data = move_to(data, args.device)
        state = integrator(dt=data['dt'],
                           gyro=data['gyro'],
                           acc=data['acc'],
                           rot=data['init_rot'])
        poses_gt.append(data['gt_pos'][..., -1, :].cpu())
        poses.append(state['pos'][..., -1, :].cpu())
        covs.append(state['cov'][..., -1, :, :].cpu())

    poses = torch.cat(poses).numpy()
    poses_gt = torch.cat(poses_gt).numpy()
    covs = torch.stack(covs, dim=0).numpy()

    # Step 5: Visualization
    plt.figure(figsize=(5, 5))
    if args.plot3d:
        ax = plt.axes(projection='3d')
        ax.plot3D(poses[:, 0], poses[:, 1], poses[:, 2], 'b')
        ax.plot3D(poses_gt[:, 0], poses_gt[:, 1], poses_gt[:, 2], 'r')
    else:
        ax = plt.axes()
        ax.plot(poses[:, 0], poses[:, 1], 'b')
        ax.plot(poses_gt[:, 0], poses_gt[:, 1], 'r')
        plot_gaussian(ax, poses[:, 0:2], covs[:, 6:8, 6:8])
    plt.title("PyPose IMU Integrator")
    plt.legend(["PyPose", "Ground Truth"])
    figure = os.path.join(args.save, args.dataname+'_'+drive+'.png')
    plt.savefig(figure)
    print("Saved to", figure)

Saved to ../dataset/save/2011_09_26_0001.png
Saved to ../dataset/save/2011_09_26_0002.png
Saved to ../dataset/save/2011_09_26_0005.png
Saved to ../dataset/save/2011_09_26_0009.png
Saved to ../dataset/save/2011_09_26_0011.png
Saved to ../dataset/save/2011_09_26_0013.png
Saved to ../dataset/save/2011_09_26_0014.png
Saved to ../dataset/save/2011_09_26_0015.png
Saved to ../dataset/save/2011_09_26_0017.png
Saved to ../dataset/save/2011_09_26_0018.png
Saved to ../dataset/save/2011_09_26_0019.png
Saved to ../dataset/save/2011_09_26_0020.png
Saved to ../dataset/save/2011_09_26_0022.png
We can see that, in some of the sequences, the integrated position drifts away from the groundtruth, also the uncertainty grows very big. This shows the noisy nature of the IMU sensor. In the IMUCorrector tutorial, we will see an example of how we can correct this.
Total running time of the script: ( 0 minutes 5.191 seconds)
